What is VAST?
The IAB's Video Ad Serving Template (VAST) specification is a universal XML schema for serving ads to digital video players. It provides support for linear pre-roll, mid-roll and post-roll MP4/FLV/WebM video ads as well as non-linear GIF/JPG/PNG, Flash (SWF), text, HTML, <IFRAME> and <SCRIPT> banners. In addition to this it also specifies video tracking events, which enables measurement of video advertising consumption.
Pre-Roll Video Ads
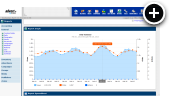
Pre-roll video ads are short 15-30 second video clips that play before the video that viewers actually intend to watch. They are comparable to television commercials. Typically viewers aren't able to skip or fast-forward pre-roll video ads, which makes them very appealing to advertisers.
Supported Video Players
With complete VAST 2.0 support, you're able to integrate both Flash and HTML5 video players to enable video advertising across both web and mobile platforms. Recommended players include: Brightcove, Flowplayer, JW Player and Projekktor. Other players should also work provided that they support the VAST 2.0 standard.
Video Players, Encoding and Hosting
Before we get into creating a pre-roll video ad like you see in the example above there are a couple of things to consider.
- You obviously need a video player that supports VAST 2.0 and it should preferably have both Flash and HTML5 capabilities to be able to simultaneously serve both web and mobile viewers.
- Videos should be encoded in MP4 format at a minimum, but it's a good idea to encode them in FLV and WebM formats as well for viewers with legacy browsers.
- It's essential to host your videos with a CDN that supports streaming video to ensure that video playback is smooth for all of your viewers around the world.
That all sounds pretty complicated right? Well, actually, it doesn't have to be. I recommend that you select JWPlayer as your video player. Why? JWPlayer is actually a hosted video player, so there's nothing for you to install on your web site and that really simplifies things for you. Video encoding should be done by the party that's providing the videos to you. That just leaves us to select a CDN and there are many of them to choose from! I personally like RackSpace Cloud Files because they are easy to work with and they stream video over Akamai's CDN, so that's what I'm going to be using in this tutorial.
Uploading a Video to RackSpace Cloud Files
Sign Up
- Go to rackspace.com and sign up for an account if you don't already have one.
- After you sign up, log in to your RackSpace cloud account at mycloud.rackspace.com
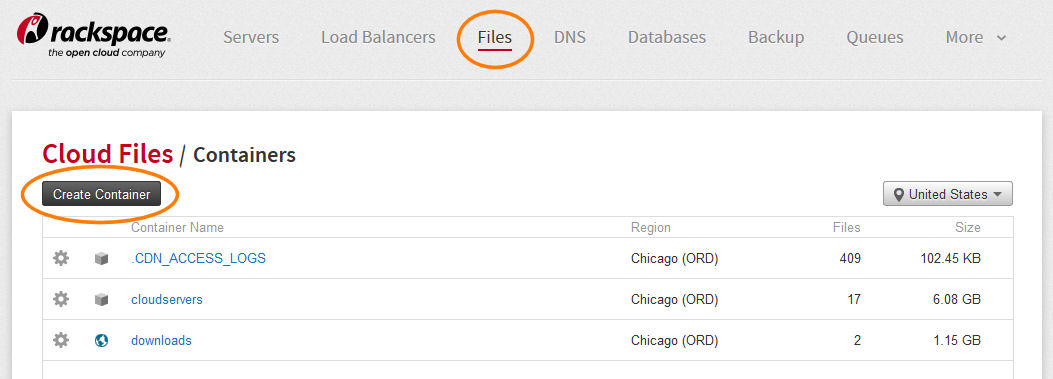
Create a Container
-
Click on the Files tab and then click on the Create Container button.
-
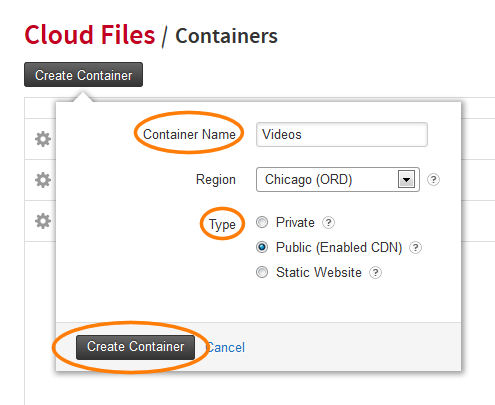
Enter a name for your container, choose Public (Enabled CDN) for the type and press the Create Container button.
Upload Your Video
-
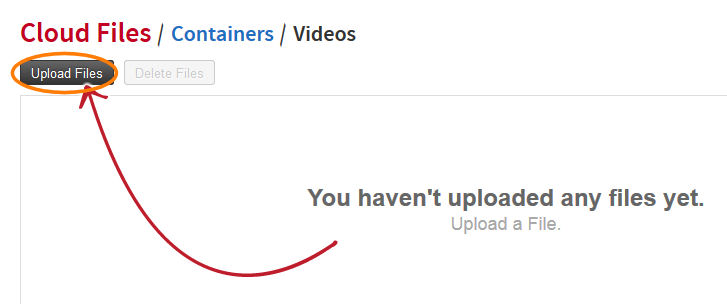
Click on the Upload Files button once your container has been created.
-
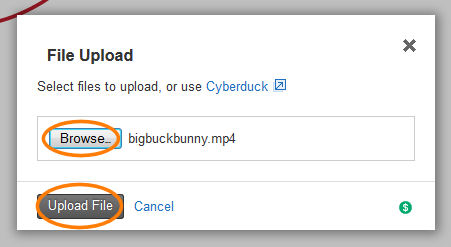
Click the Browse button. Then locate and select the MP4, FLV or WebM file(s) on your computer that
you would like to upload. I'm using a video for the Big Bug Bunny movie. Finally, press the Upload File button.
Obtain the Video Progressive and Streaming URLs
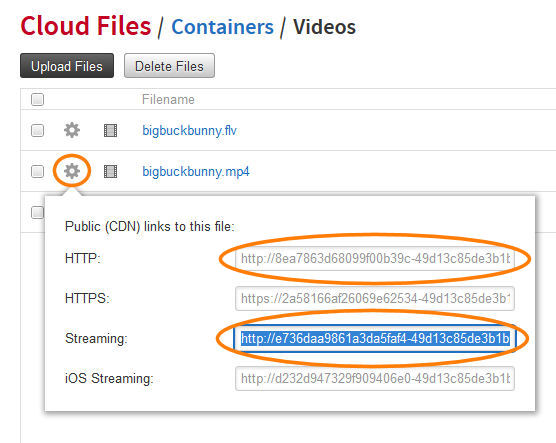
- Once your video has been uploaded it will appear in the list of files in your container.
- Click on the little gear icon to the left of the video file.
- Then click on View All Links... in the popup menu that appears.
-
You will see a little window then pops up with several URLs. The two that
we are interested in and need to copy are labeled HTTP (this is the progressive one) and Streaming
as shown in the screenshot below.
Creating a Pre-Roll Video Ad
Creating the Media
You'll obviously want to set up a zone with multiple campaigns/media on your live web site, but for the purpose of this example we'll skip those extra steps.
- Log in to your AdvertServe account.
- Go to Media and create a new media. Select Pre/Mid/Post-Roll Video for the media type.
- Enter a Width of 320 and a Height of 180 for the video with a Duration of 30 seconds.
- You can use http://www.bigbuckbunny.org/ for the Redirect URL
- Then you'll need to enter the progressive and streaming URLs of the MP4, FLV or WebM video file(s) that you copied from RackSpace Cloud Files.
-
Review your settings and make sure they look like the ones in the screenshot below.
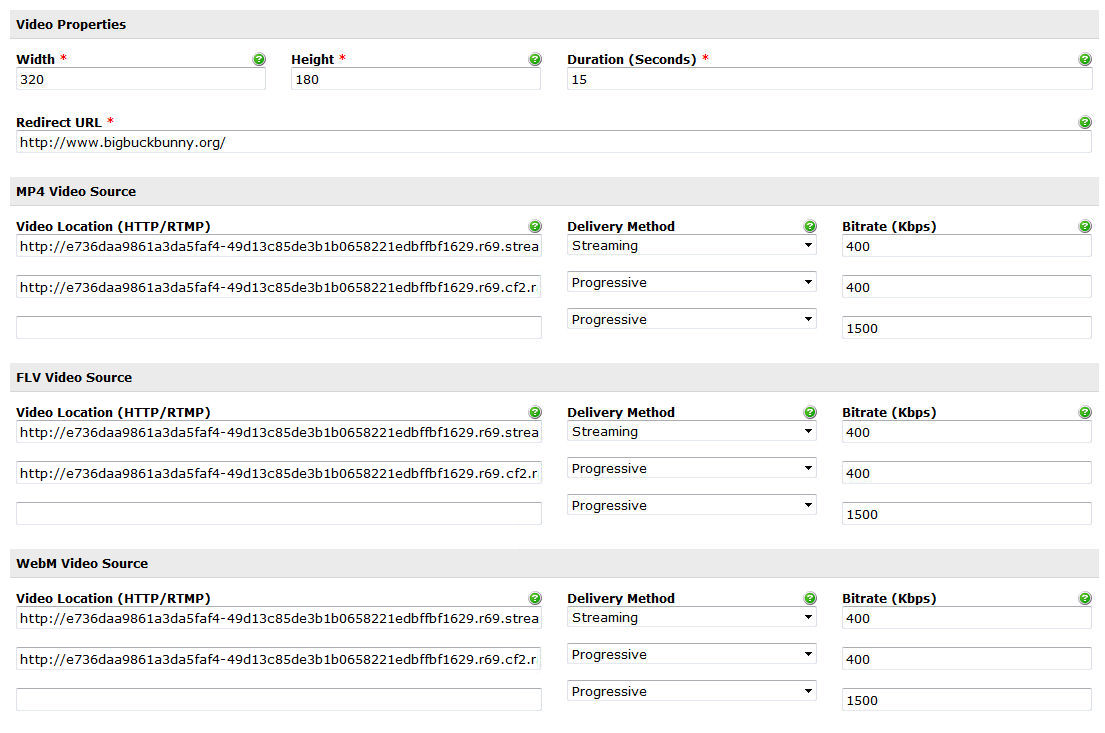
- Press the Create Media button.
Generating the VAST Tag
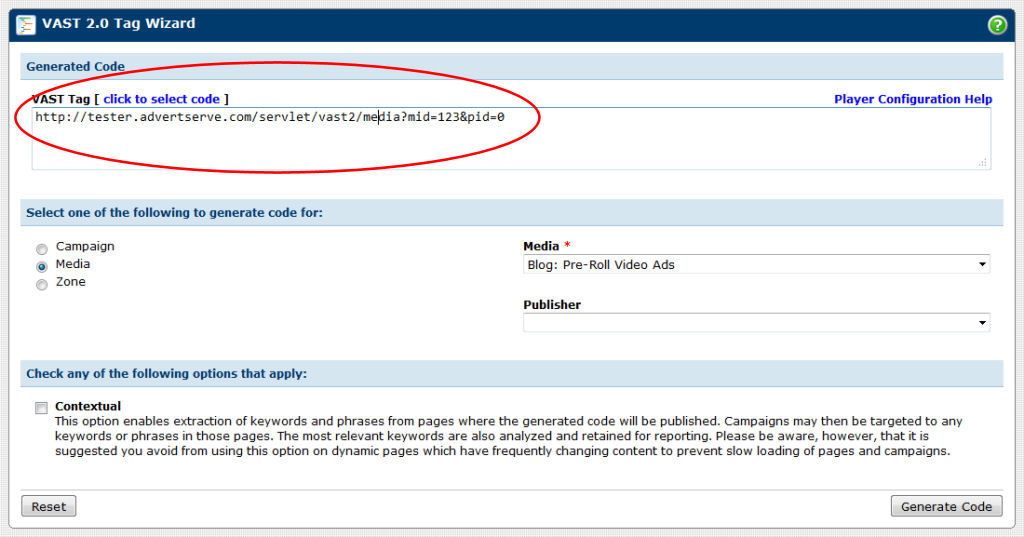
- After you have successfully created the media, simply click on the Generate Code shortcut that appears on the top right side of the screen.
-
You'll be presented with a VAST Tag that you simply need to copy and paste into the JWPlayer
settings.
JWPlayer Configuration
- Go to jwplayer.com and sign up for the JW Player enterprise plan if you haven't already.
- Log in to your JW Player account.
-
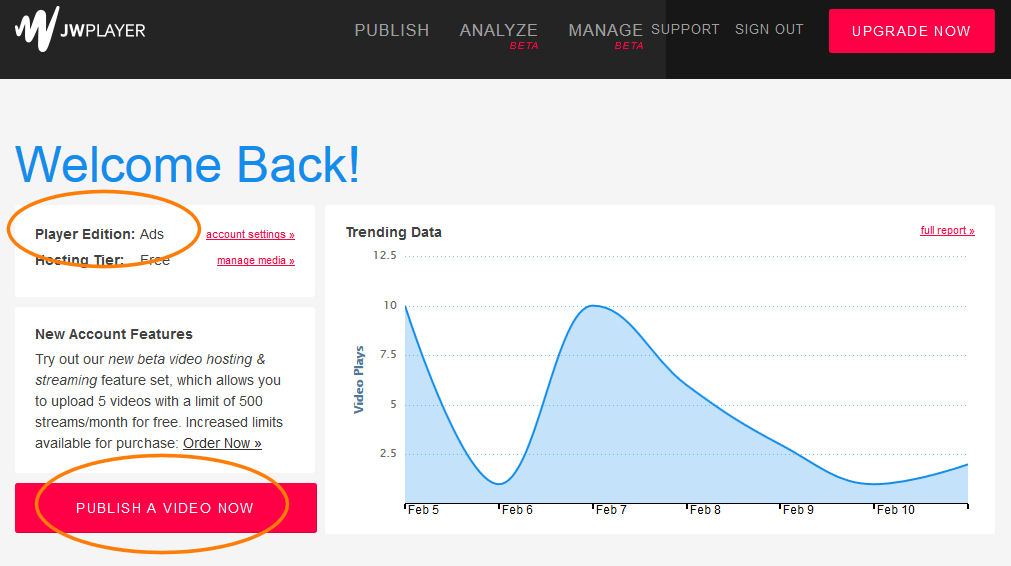
Click on the Publish a Video Now button and make sure your Player Edition is the Ads version as
shown in the screenshot below.
-
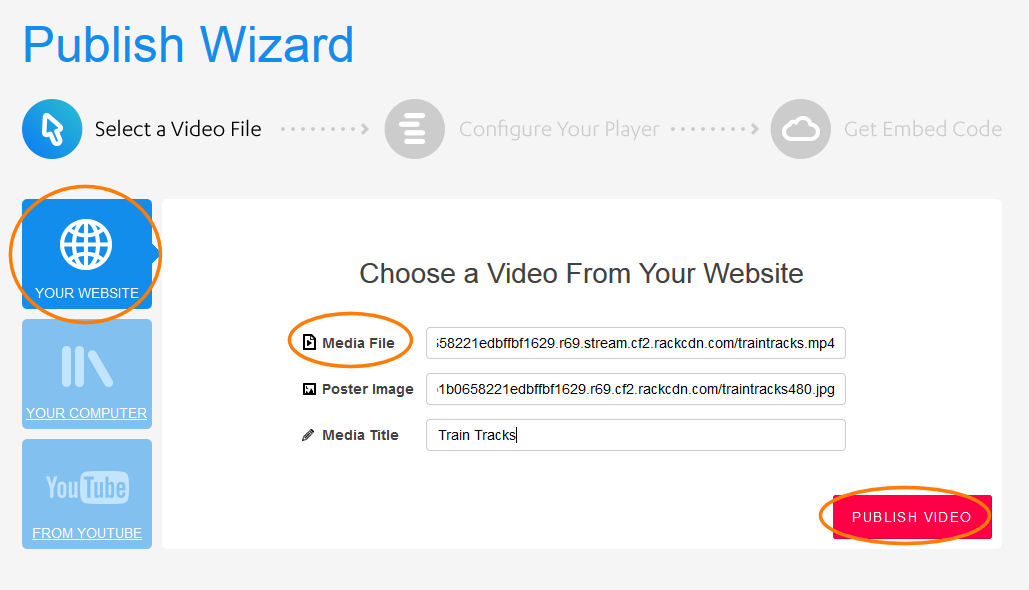
Click on the Your Website button and then you'll need to enter the streaming URL for another
video that you've uploaded to RackSpace Cloud Files. I'm using a video of an animated flyby over some train tracks.
I also happen to have a JPG image that I'm using for the poster image as shown in the screenshot below, however,
this is completely optional.
-
On the next screen you'll be able to customize the video player to your liking.
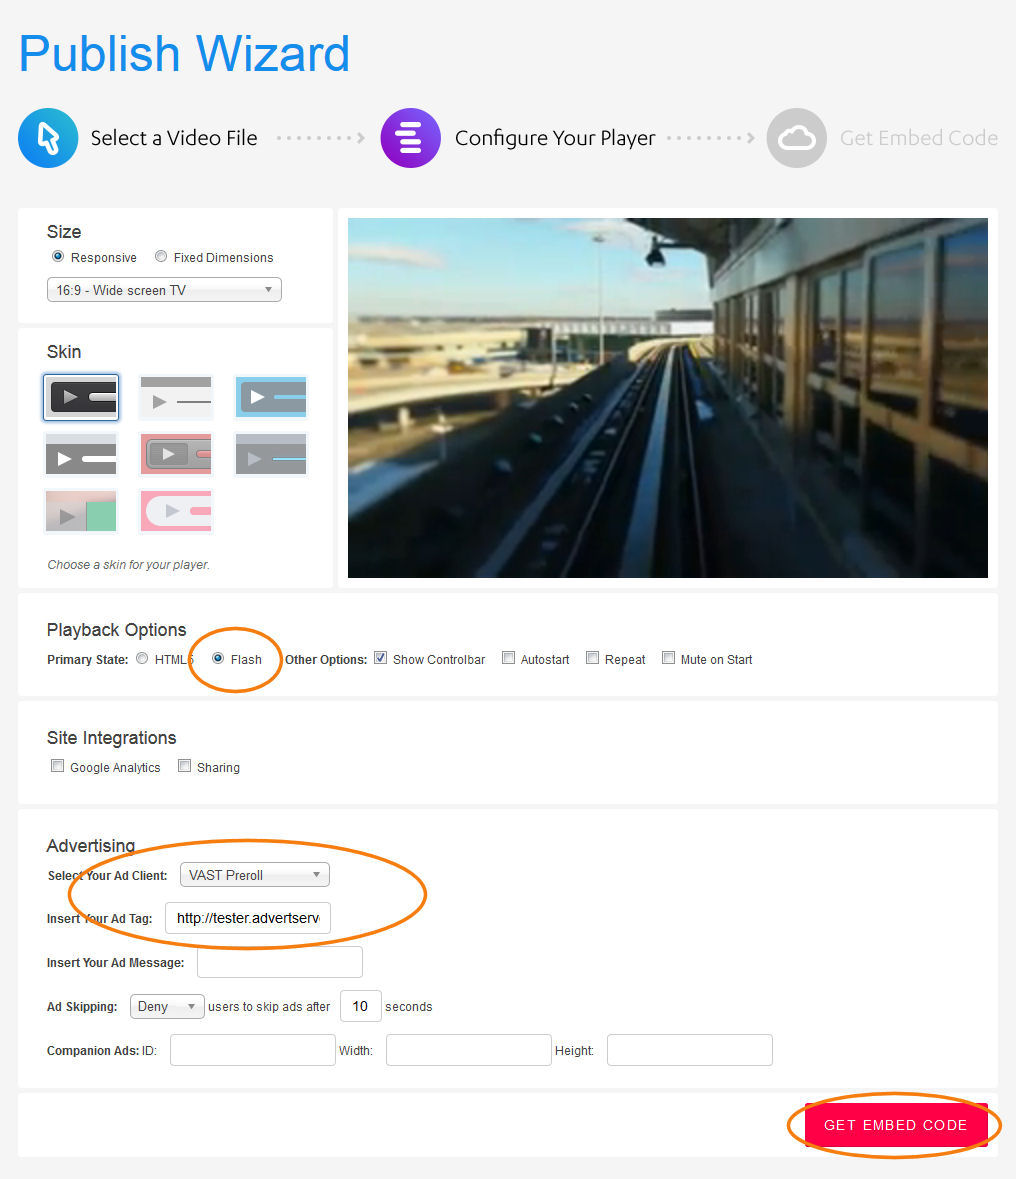
- Make sure that your primary player is selected as Flash and it will automatically fall back on using HTML5 for visitors without Flash capability.
- You then need to select VAST Preroll for the Ad Client and enter the VAST Tag that you generated earlier into the provided Insert Your Ad Tag box as shown in the screenshot above.
- When everything is set how you like it press the Get Embed Code button.
Publishing Your Video
The first part of the Embed Code should be pasted into the <head> section of your page
and will look similar to the following:
<script src="http://jwpsrv.com/library/yourlicensekey.js"></script>
The second part of the Embed Code should be pasted into the <body> section of your page
where the video should actually appear and will look similar to the following:
<div id='playerlY5ILoW2TpH4'></div>
<script type='text/javascript'>
    jwplayer('playerlY5ILoW2TpH4').setup({
        file: 'http://e736daa9861a3da5faf4-49d13c85de3b1b0658221edbffbf1629.r69.stream.cf2.rackcdn.com/traintracks.mp4',
        image: 'http://8ea7863d68099f00b39c-49d13c85de3b1b0658221edbffbf1629.r69.cf2.rackcdn.com/traintracks480.jpg',
        width: '480',
        height: '270',
        aspectratio: '16:9',
        stretching: 'fill',
        primary: 'flash',
        advertising: {
            client: 'vast',
            tag: 'https://tester.advertserve.com/servlet/vast2/media?mid=234&pid=0&random=__random-number__'
        }
    });
</script>
I've actually changed the width and height to 480x270 in the above code
and added the stretching: 'fill' option to make the video stretch to
fill that entire space.
Final Thoughts
This was a great introduction to video ad serving, but VAST has much more to offer. We will be publishing more blogs in this series. This will include coverage of mid/post-roll video ads, companion banners and non-linear banners so stay tuned!
 Mike Cherichetti