How It Works
With header bidding built into AdvertServe, the ad server is able to inject an on-the-spot RTB auction into a zone, which allows multiple demand partners to simultaneously bid on your inventory to maximize your revenues.
Demand Sources
The ad server is able to connect with any demand partner that has an adapter available for Prebid.js and as of this writing there are over 150 of them!
Direct Deals
One of the most exciting things about this is programmatic direct deals, which allows your advertisers to buy impressions from you programmatically provided that they're working with a DSP (demand side platform) that supports header bidding such as AppNexus, OpenX, or RubiconProject just to name a few.
The rest of this short guide will walk you through the process of getting demand partners set up in the system, creating demand tags and configuring auctions to run in your zones.
Demand Partners
The first thing you will need to do is create an advertiser account for each of your demand partners. If your demand partner already has an advertiser account in the system you can use that account. It is not necessary to create a new account for them.

- Go to Accounts and either edit an existing advertiser or Create a New Advertiser
- Scroll down and click on Header Bidding
- Select the Bid Adapter for your advertiser
- You can then enter a Bid Adjustment, which can be used to reduce gross bids to net bids. This is not necessary for all demand partners. Some demand partners send gross bids while others send net bids, so you should ask your partner which is the case and the amount of your revenue share.
- Optionally you can also enter account-level bid parameters. This can be useful for bid parameters such as your accountId or common data fields that can be filled with macros. Entering them on the advertiser account avoids the duplicate work of having to repeatedly enter them for each of the advertisers demand tags.
Demand Tags
The next step is creating demand tags. At a minimum you will need to create a set of demand tags for each demand partner and for each ad size you are interested in running, i.e. 728x90, 300x250 and 160x600.

- Go to Media and click on Create New Media
- Enter a Name for the media, i.e. AppNexus 728x90
- Select the Advertiser, i.e. AppNexus
- Select HTML Banner for the Type
- Select a Size, i.e. 728x90
- Now press the Insert Bid Response Macro button and it will automatically insert a macro into the HTML Content box, which is the only thing that needs to be entered although you could add additional content such as third-party pixels if required.
- Optionally you can enter a Deal ID, but this should only be done for direct or private marketplace deals.
- The last step is to fill out the Bid Parameters and this process is slightly different for every demand partner. Some of them have more parameters than others. The ad server will help you out though by populating the required parameter names for each demand partner, so you only need to input the values.
Just make sure that you have inserted the bid response macro and that the bid parameter values you enter are correct or your demand partner may reject bids or fail to fill them!
Auctions
The last step is creating an auction to run the demand tags, which is very similar to the process of creating a campaign.

- Go to Campaigns and click on Create New Auction
- Enter a Name for the auction, i.e. Example.com Header Bidding
- Enter the desired Price Floor for the auction, which is the minimum bid you will accept from any demand partner.
- Enter the Timeout in milliseconds. Typically the default timeout of 1000ms will work well. You can always come back and adjust the timeout lower if you're seeing a low completion rate or higher if you're seeing a high timeout rate.
- Just like with a regular campaign you can select your demand tags under Media and assign them to the campaign
- Select the Zones where you want to run
- Now press the Create Auction button to finish things up.
Waterfalling
Typically you will want to utilize waterfalling with header bidding auctions.
Consider, for example, that you want to set up a waterfall like this:
- Header Bidding Auction with Price Floor at $2.00 CPM
- Direct Campaigns
- Header Bidding Auction with Price Floor at $0.01 CPM
- In-House Campaign
What would happen here is the ad server would first attempt the $2.00 CPM auction. If it does not fill then your direct campaigns would be evaluated. In the event there are no direct campaigns to show, i.e. they may not target a user or could have exhausted their frequency caps, then the $0.01 CPM auction would run. In the event that it also fails then you could have an in-house campaign that could run as a filler.
Let's take a look at how we would actually set up such a waterfall in the system.

In this case we've edit the campaign assignments of a zone and we can see that it has two auctions and two campaigns. The $2.00 auction will run first because it has the highest chain value. It would be followed by the direct campaign, $0.01 auction and in-house campaign as the ad server waterfalls down through the chains from highest to lowest.
The interesting thing about how this works is you can have multiple direct campaigns in the same chain and they might have different targets, limits, frequency caps, etc... You might also have noticed that auctions can have targets too? Well, yes, they can and the reason for that is optimization. You might have different demand partners that perform better with traffic from North America while others perform better with traffic from Europe. What you could do is create different auctions with the appropriate mix of demand partners and geo-target them to the desired locations. Those auctions can both be placed in the same chain and the ad server will run the appropriate one based on each users actual location.
You might be wondering why you wouldn't just put all demand partners into just one auction though? Wouldn't it yield the highest price without geo-targeting? Yes, it would, but what you have to understand is that you don't have unlimited time to wait for bids from dozens of partners before a visitor leaves a page and you end up not showing them any ads. Ideally you don't want to have more than 5-8 demand partners in an auction so you aren't waiting more than 1 second for a much larger number of bids to come back. That is why optimizing with multiple country-specific auctions can help as you can cherry pick the best demand 5-8 partners for each country instead of putting 10-20 partners in a single auction that will be prone to timeouts.
Macros
As mentioned above it is possible to use macros for bid parameter values. While we have tons of built-in macros there are also header bidding specific macros that you can set on your zones. Here's a screenshot showing the macros you can set:

Each of those different settings has a corresponding macro you can use in the bid parameter values:
- $$FLOOR - Price floor from campaign/auction settings
- $$IAB - IAB category code from zone settings
- $$POSITION - Ad position on screen from zone settings
- $$COPPA - COPPA flag from zone settings
- $$PRIVACY - Privacy flag from zone settings
- $$SSL - SSL flag from zone settings
- $$MIMES - Array of allowed mime types from zone settings
Not all demand partners will be able to use these values, but for the ones that do it can improve fill rate by setting them.
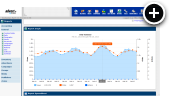
Reporting
You can go to Reports > Inventory > Auctions to see the performance of your auctions.
Here's an overview of the metrics you will see in that report:
- Completions show the percentage of initial impressions ran a successful auction to completion, so either a demand tag or a direct campaign was displayed.
- Fill Rate shows the percentage initial impressions were filled with a demand tag.
- Wins shows how many actual impressions were filled with a demand tag.
- Losses shows how many actual impressions failed to fill with a demand tag.
- Timeouts shows how many losses were due to timeouts rather than bids being too low.
Keep in mind that all of these fields are also documented at the bottom of the report, so you can easily refer to them.
As mentioned above though if you see a low completion rate it is a good indication that you need to reduce the auction timeout whereas if the completion and timeout rates are high increasing the timeout might be a good idea.
 Mike Cherichetti