
Parent/Child Campaigns
The idea with parent/child campaigns is that sometimes a campaign leads to other campaigns being created and they need to be directed by the originating campaign. Very much like the relationship between a parent and their children. Don't worry though, child campaigns always follow the rules set forth by their parent campaign (unless you tell them not to, but more on that later).
Real World Examples
Now that I have had my fun trying to rationalize naming this new feature parent/child campaigns lets get serious with some real world examples of when you might use them.
To keep things simple lets assume that for all of these campaigns the advertiser is buying 1 million impressions from US visitors only and they want them to be run over a period of four weeks.
- Advertiser A has four different variations of their creative and rather than run them in a rotation they would like you to set it up so each creative runs for one week.
- Advertiser B only has two creatives, but they want one of them to only appear on the blog section of your site while the other should appear throughout the rest of the site.
- Advertiser C has one creative that they wish to run as a lightbox with a frequency cap of 1 view per day (per visitor) as well as a set of 728x90, 300x250 and 160x600 creatives that may run throughout the site without any capping.
The challenge with all three of these advertisers is that their desired goals require you to split their campaign into multiple campaigns. This creates a problem for you because that means you must divide up the 1 million impressions and keep a close eye on each of the campaigns to tweak their impression allocation if needed, which is tedious and prone to error. It is also somewhat undesirable for the advertiser because you cannot give them a single campaign report for all of their creatives.
The Solution
As you might have guessed, yes, all of these types of challenges can be solved with parent/child campaigns. Parent campaigns are able to define a schedule, frequency capping, delivery limits and targeting. Child campaigns can then be directed to inherit some or all of those settings while having their own media/zone assignments. In addition to this, the reporting system recognizes parent campaigns and automatically bundles the child campaigns together with them allowing you to deliver a single report with line items for each of them.
Creating the Parent Campaign
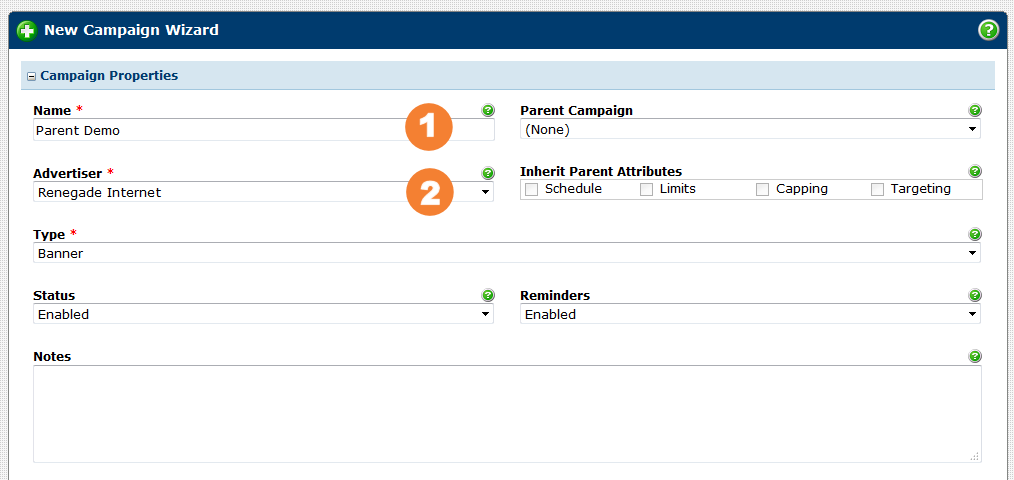
From the requirements above we know that the parent campaign needs to run for 30 days, have a max views limit of 1 million with even distribution and it should also be US targeted.
- First we need to give our parent campaign a name and select an advertiser:
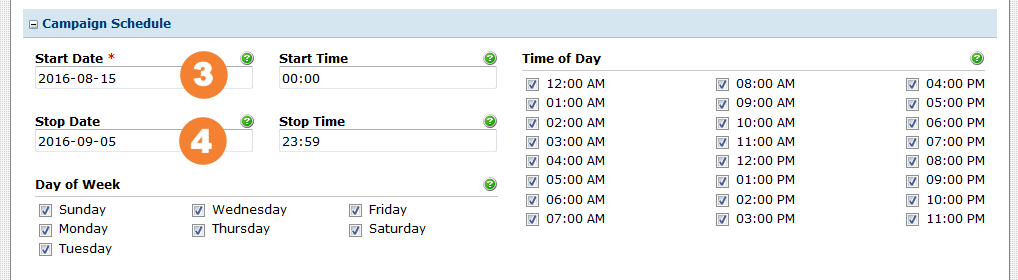
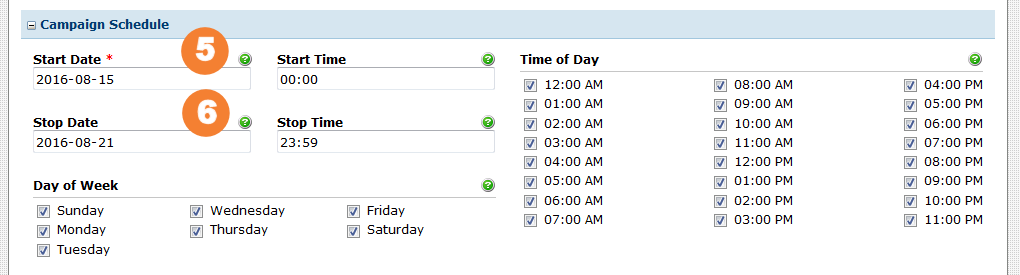
- Next we need to set the start and stop dates, which should be four weeks apart:
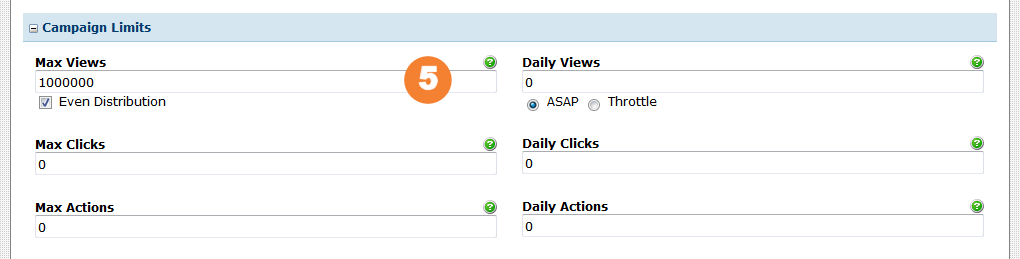
- Then we can enter the max views limit of 1 million and check on even distribution:
- All that is left to do now is select the United States as a targeted country:

- Finally, you can press the Create Campaign button to create the parent campaign.
That was really weird though right? We did not add any media or zones to the campaign. Good observation! While this may seem strange at first, remember that the child campaigns are going to have different media and/or zone assignments. The parent campaign is simply setting forth some rules.
Creating the Child Campaigns
Now lets focus on Advertiser A and what they wanted was to have four different creatives that each run for a week.
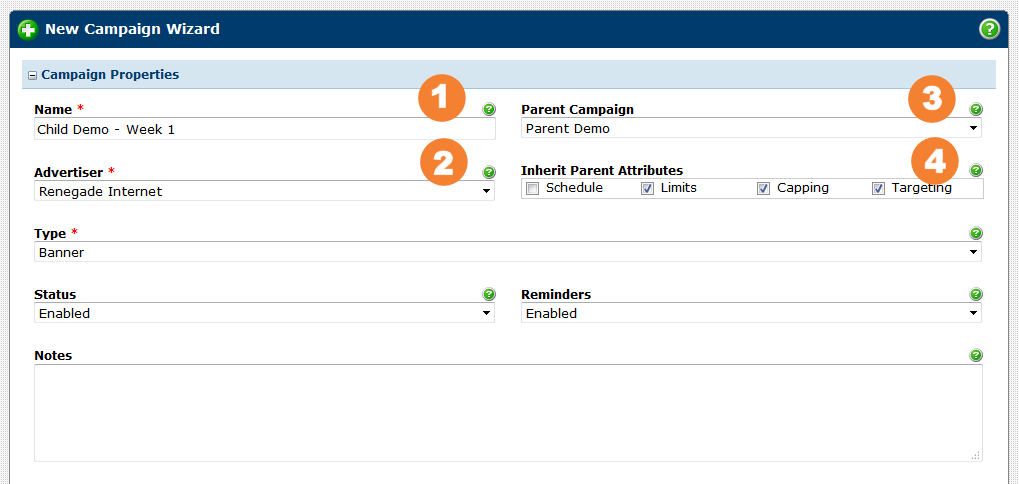
- Just as with the parent campaign the first step is to enter a name for
the child campaign and select an advertiser, but we must also associate
the child campaign with its parent and inherit everything except for
its schedule because each child campaign will have their own schedule in
this scenario.
- Next we need to set the start and stop date, which should be one week apart:
- Then you can proceed to assign the first media to the campaign and then assign it to the zones where it needs to run.
- Finally, you can press the Create Campaign button to create the first child campaign.
- Repeat this same process for the other three child campaigns incrementing the weeks they run and assigning the next media with them.
Wrapping Up
Now that you have created a parent campaign with four child campaigns it might seem like it could be hard to keep all of them straight? Well, perahps, but if you noticed the child campaign wizards were shorter right? In fact, they were shorter because all of the settings being inherited from the parent were hidden. We designed it this way to keep the child campaigns as simple as possible so they are less work to manage.
If you actually go back and edit the parent campaign you will see in the campaign overview that it provides a link to each of the child campaigns. The child campaigns also provide a link back to the parent campaign. This allows you to easily navigate between them, which really helps to keep things straight.
In addition to that, the campaign listing allows you to filter it to only show parent or child campaigns and that can be helpful to search for them.
Remember also that if you generate a report for the parent campaign it will automatically include line items for the child campaigns, so the amount of reporting work you need to do compared to creating completely separate campaigns in the past is greatly reduced.
More Examples
Well, wait, what about Advertiser B and Advertiser C? I am going to leave those as exercises for you to complete on your own. The parent campaign will be set up identically to the one for Advertiser A. However, I will give you some pointers on how to set up the child campaigns.
Advertiser B wanted to have one creative appear on your blog and a second creative appear elsewhere on your site. Right away you should recognize you need two child campaigns. They can inherit the schedule, capping, limits and targeting from the parent since they share all of those goals in common. The only difference will be that the first child campaign will only be assigned to your blog zone(s) while the second child campaign will be assigned to the rest of your zones and they'll have different media assignments.
Advertiser C was a little more complicated because they wanted to run a lightbox with a frequency cap and then have their 728x90, 300x250 and 160x600 creatives run without any capping. Again we are going to need two child campaigns. The first child campaign for the lightbox will only inherit the schedule, limits and targeting so it can set its own frequency cap. Then the second child campaign can simply inherit all settings from the parent since it has no such requirement. Each of the child campaigns will of course have entirely different media and zone assignments too.
Final Thoughts
Hopefully you learned a lot from this short tutorial and will start thinking about more ways you can utilize parent/child campaigns to simplify how you deal with complex campaign requirements. Maybe you will even come up with a new idea about how we can make parent campaigns better. In fact, that happened with our beta testers as we originally didn't see a use case for child campaigns to inherit frequency capping but they proved us wrong!
 Mike Cherichetti